
CROCHET CHRISTMAS ORNAMENT PATTERN LIGHTED LANTERN BAUBLE
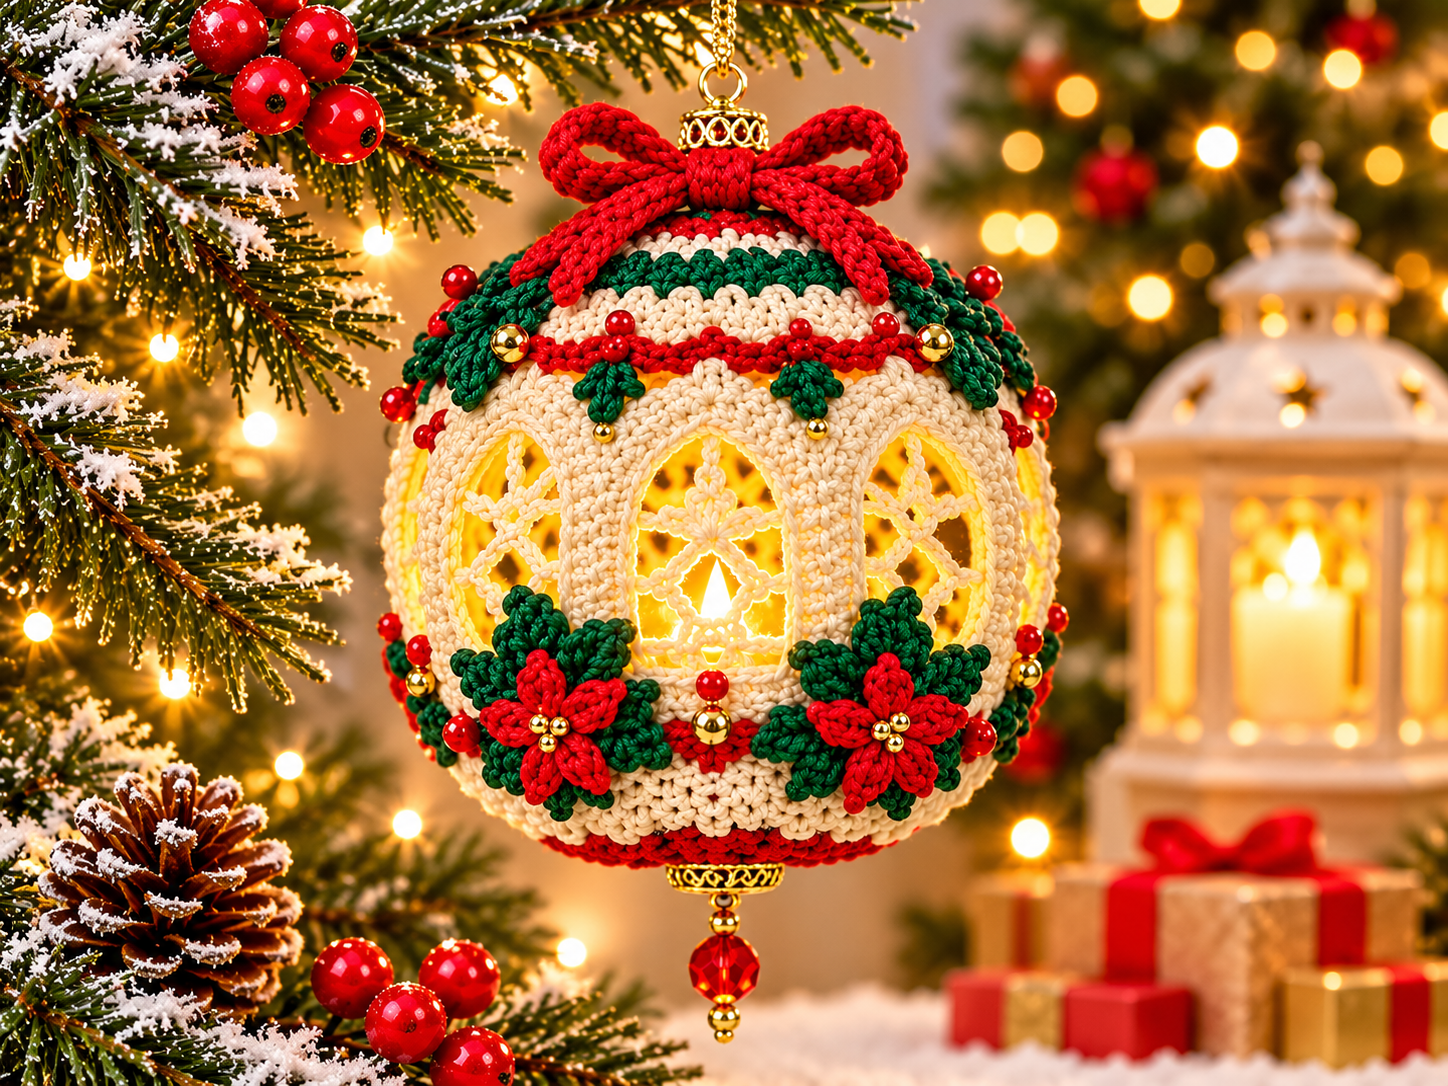
Create a beautiful Christmas lantern bauble with a cream crochet body, decorative arched windows, warm LED lighting, red and green holly decorations, a festive bow, and a hanging bead ornament. This project is designed as a decorative Christmas tree ornament or hanging holiday display.
Finished Size
Approximately 6–7 inches wide and 7–8 inches tall, excluding the hanging loop and bottom pendant. The finished size depends on yarn thickness, hook size, and tension.
Skill Level
Intermediate
Materials
- Cream cotton yarn – approximately 150 g
- Dark green cotton yarn – approximately 25 g
- Red cotton yarn – approximately 35 g
- White cotton yarn – approximately 15 g
- Gold yarn – small amount
- 3.5 mm crochet hook
- Yarn needle
- Scissors
- Stitch markers
- Small red and gold beads
- Battery-operated warm LED light
- Gold hanging cord
- Lightweight plastic support ring, optional
Abbreviations (US Terms)
- MR – Magic Ring
- ch – Chain
- sc – Single Crochet
- hdc – Half Double Crochet
- dc – Double Crochet
- tr – Treble Crochet
- sl st – Slip Stitch
- inc – Increase (2 sc in one stitch)
- dec – Single Crochet Decrease
- st – Stitch
- sts – Stitches
- sp – Space
- sk – Skip
- rep – Repeat
- rnd – Round
Gauge
Work a small swatch in single crochet. Aim for approximately 18 sc × 20 rows = 4 inches using the 3.5 mm hook. Adjust your hook if necessary.
Construction Overview
The lantern is constructed from six cream window panels joined into a rounded body. Decorative arches and lace motifs are added to the panels. Circular top and bottom covers close the body, while the LED light sits inside. The stripes, flowers, holly leaves, bow, and hanging decorations are attached afterward.
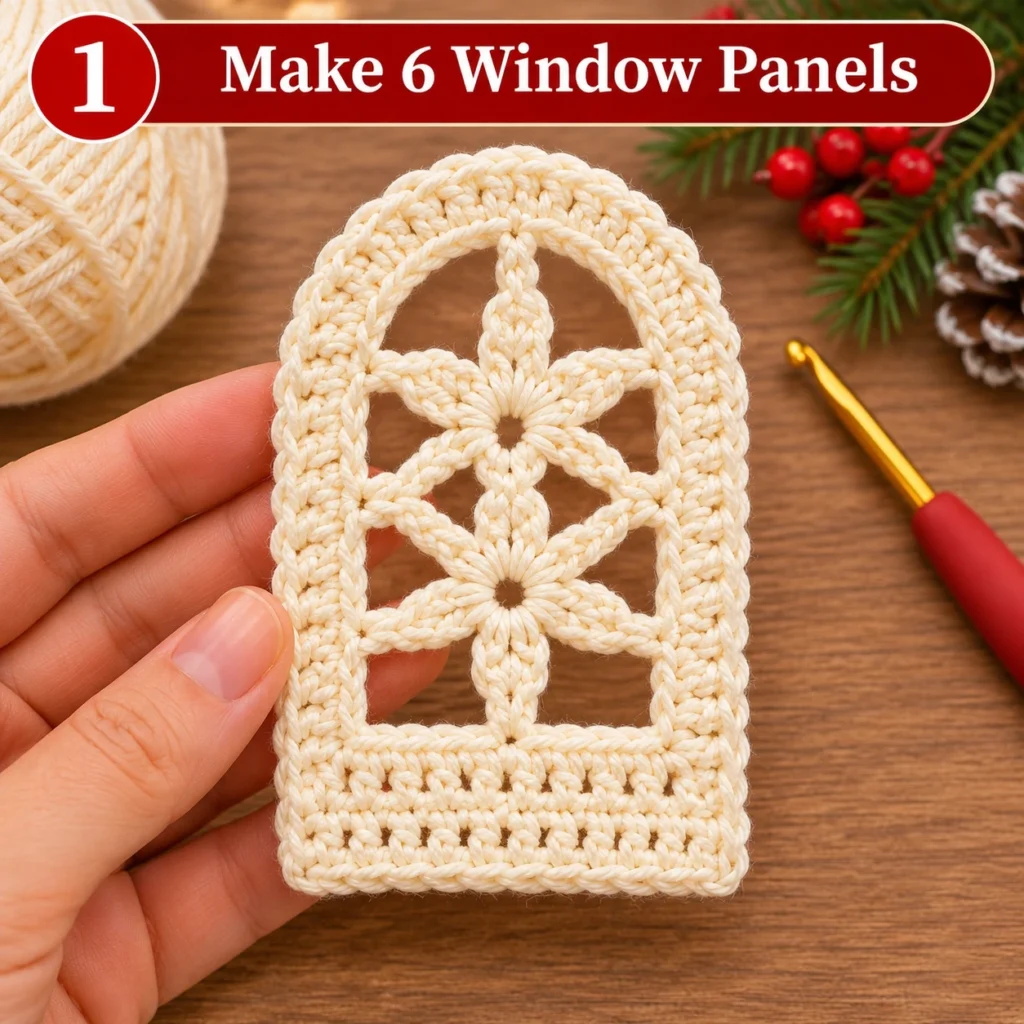
Part 1 – Cream Window Panels
Make 6 identical panels using cream yarn.
Foundation: Ch 16.
Row 1: Sc in 2nd ch from hook and in each remaining ch. (15 sc)
Rows 2–5: Ch 1, turn, sc in each st across. (15 sc)
Row 6: Ch 1, turn, sc in first 2 sts, ch 1, sk next st, sc in next 3 sts, ch 1, sk next st, sc in next 3 sts, ch 1, sk next st, sc in last 3 sts. (11 sc, 3 ch-1 spaces)
Row 7: Ch 1, turn, sc in first 2 sts, ch 1, sc in next ch-1 sp, ch 1, sc in next 3 sts, ch 1, sc in next ch-1 sp, ch 1, sc in next 3 sts, ch 1, sc in next ch-1 sp, ch 1, sc in last 3 sts.
Row 8: Ch 1, turn, sc in each sc and work 1 sc in each ch-1 space. (17 sc)
Rows 9–11: Ch 1, turn, sc in each st across. (17 sc)
Row 12: Ch 1, turn, sc in first 3 sts, ch 1, sk next st, sc in next 3 sts, ch 1, sk next st, sc in next 3 sts, ch 1, sk next st, sc in last 4 sts. (13 sc, 3 ch-1 spaces)
Row 13: Ch 1, turn, sc in first 3 sts, ch 1, sc in next ch-1 sp, ch 1, sc in next 3 sts, ch 1, sc in next ch-1 sp, ch 1, sc in next 3 sts, ch 1, sc in next ch-1 sp, ch 1, sc in last 4 sts.
Row 14: Ch 1, turn, sc in every sc and 1 sc in each ch-1 space. (19 sc)
Rows 15–18: Ch 1, turn, sc in each st across. (19 sc)
Fasten off, leaving a long sewing tail.
Make five more identical panels.
Part 2 – Window Arch Edging
Make 6 arches using cream yarn.
Ch 13.
Row 1: Sc in 2nd ch from hook and in each remaining ch. (12 sc)
Row 2: Ch 1, turn, sc in first 2 sts, hdc in next 2 sts, dc in next 4 sts, hdc in next 2 sts, sc in last 2 sts. (12 sts)
Row 3: Ch 1, turn, sc in first 2 sts, hdc in next 2 sts, dc in next 4 sts, hdc in next 2 sts, sc in last 2 sts. (12 sts)
Fasten off, leaving a sewing tail.
Gently curve each strip into an arch. Sew one arch above the openwork area of each panel. Keep the six arches at the same height.
Part 3 – Small Lace Window Motifs
Make 6 motifs using cream yarn.
Rnd 1: Make MR and work 8 sc into the ring. Sl st to join. (8 sc)
Rnd 2: Ch 4, sl st in next st, ch 4, sl st in next st. Repeat around to create 4 chain loops.
Rnd 3: In each ch-4 loop, work 1 sc, 1 hdc, 2 dc, 1 hdc, 1 sc. Sl st to finish.
Fasten off, leaving a sewing tail.
Position one motif in the openwork area of each panel. Sew the motif lightly at four points so the open spaces remain visible.
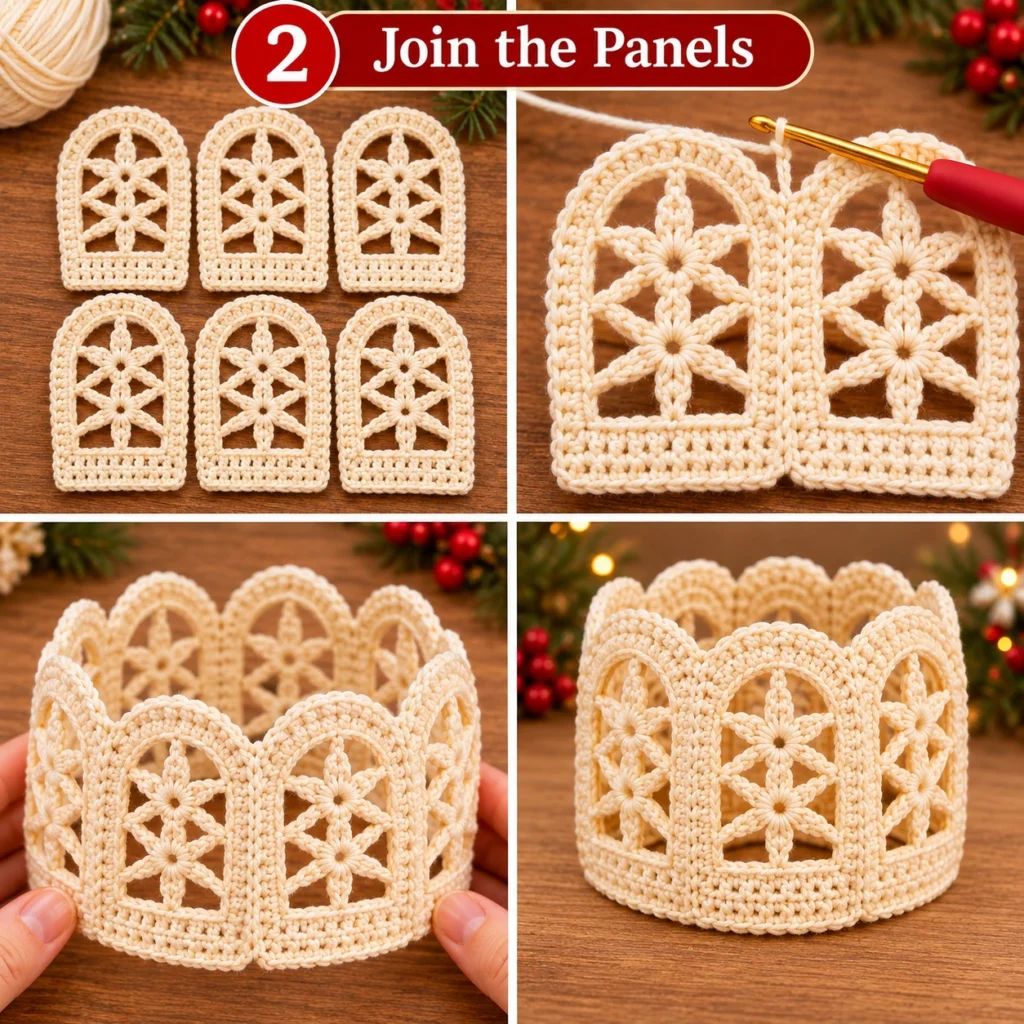
Part 4 – Joining the Six Panels
Arrange the six panels in a circle with their window designs facing outward.
- Place two panels side by side with their edges aligned.
- Join the matching side edges using cream yarn and sl st through both layers.
- Add the third panel in the same way.
- Continue until all six panels form a circular body.
- Join the final panel to the first panel.
- Check that the upper and lower edges are level.
- Do not close the top or bottom openings yet.
Keep the joining stitches even. Avoid pulling the seams too tightly, as this can distort the window panels.
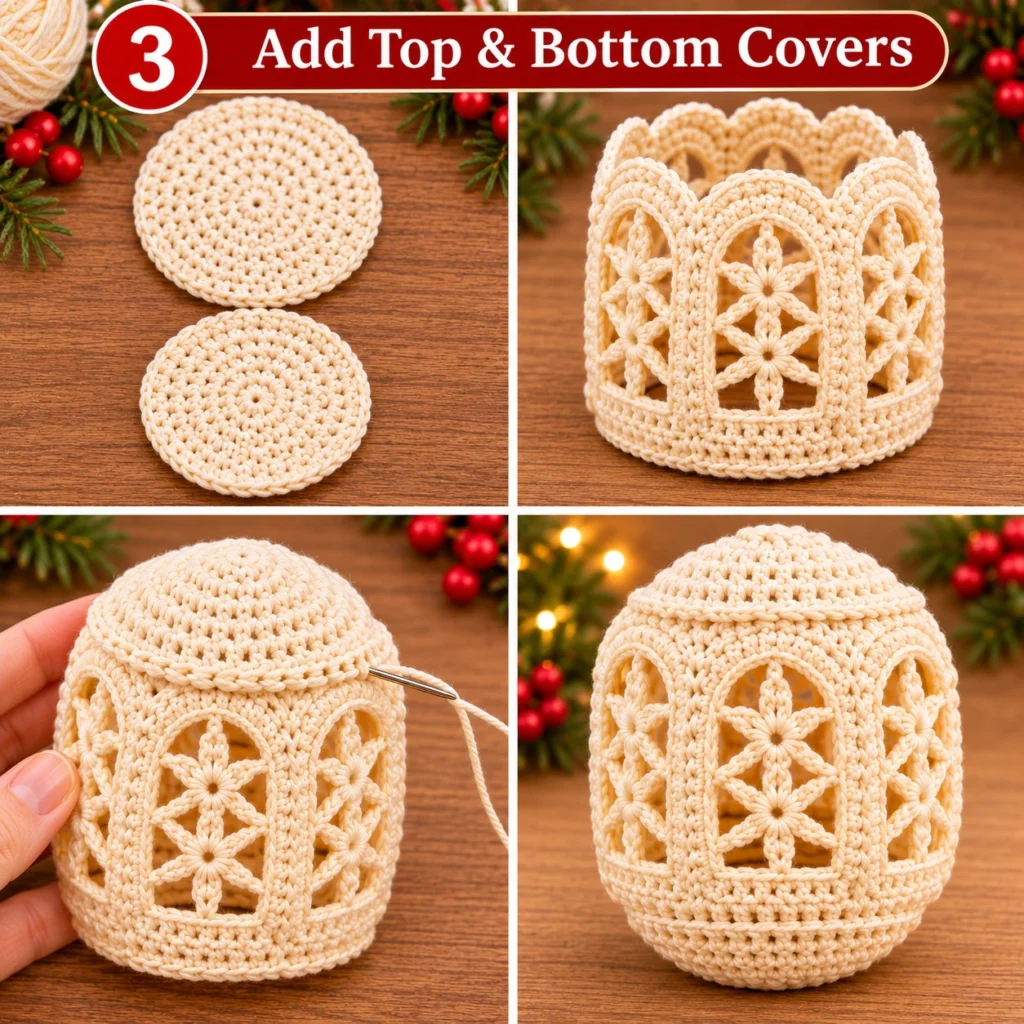
Part 5 – Top Circular Cover
Use cream yarn.
Rnd 1: Make MR and work 6 sc into the ring. (6 sc)
Rnd 2: Inc in every st. (12 sc)
Rnd 3: Sc in next st, inc in next st. Rep around. (18 sc)
Rnd 4: Sc in next 2 sts, inc in next st. Rep around. (24 sc)
Rnd 5: Sc in next 3 sts, inc in next st. Rep around. (30 sc)
Rnd 6: Sc in next 4 sts, inc in next st. Rep around. (36 sc)
Rnd 7: Sc in next 5 sts, inc in next st. Rep around. (42 sc)
Rnd 8: Sc in next 6 sts, inc in next st. Rep around. (48 sc)
Fasten off, leaving a long sewing tail.
Sew the circle evenly to the top edges of the six joined panels. Distribute the stitches evenly so the cover does not pull the panels out of shape.
Part 6 – Bottom Circular Cover
Repeat Part 5 using cream yarn.
Before sewing the cover completely, check the size of your battery-operated LED light. Place the light inside and confirm that it can be removed for battery replacement.
Sew the bottom cover to the lower edges of the six panels. If your LED needs access, leave a small opening with a secure removable closure.
Do not permanently trap the battery or light inside the ornament.
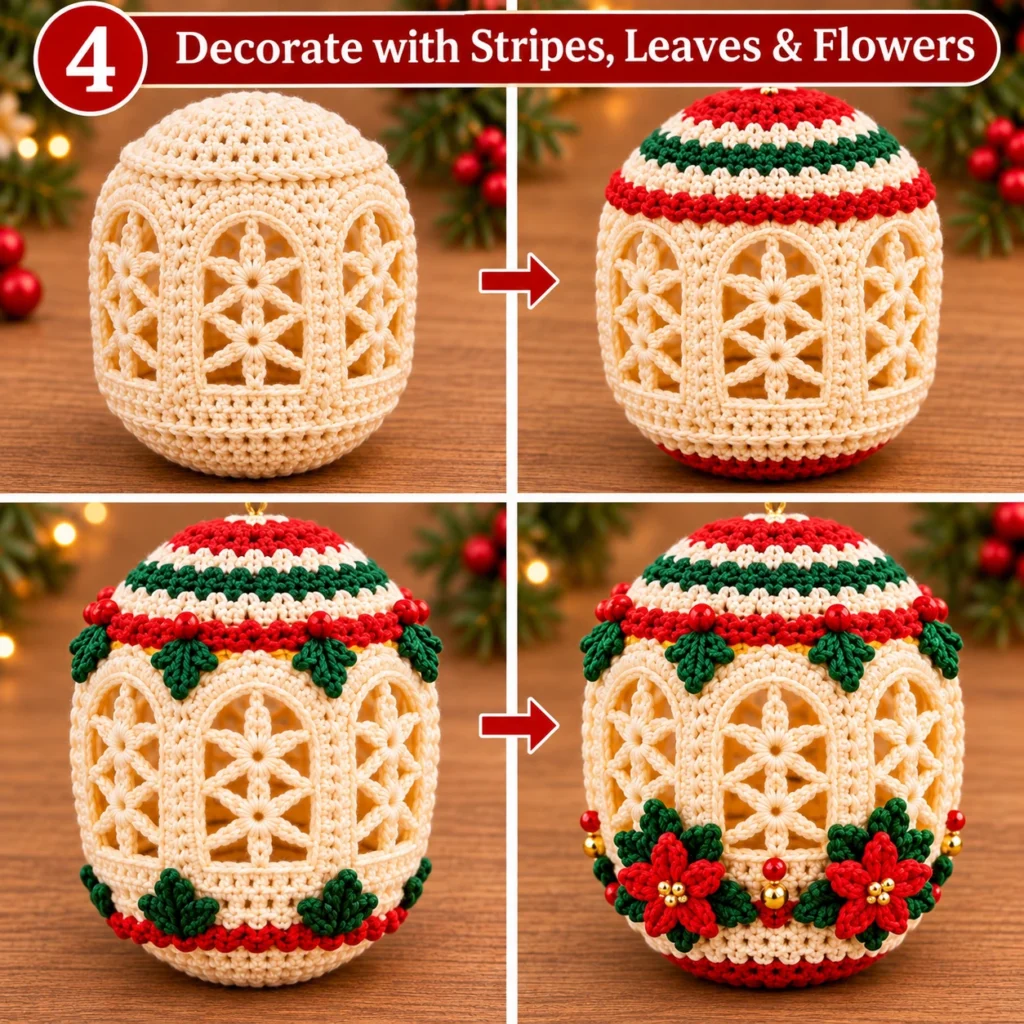
Part 7 – Red, White, and Green Stripes
Use red yarn.
Rnd 1: Join red yarn around the upper edge of the lantern. Work sc evenly around.
Rnd 2: Ch 1, sc in every st around. Sl st to join.
Change to white yarn.
Rnd 3: Ch 1, sc in every st around. Sl st to join.
Change to dark green yarn.
Rnd 4: Ch 1, sc in every st around. Sl st to join.
Change to cream yarn.
Rnd 5: Ch 1, sc in every st around. Sl st to join.
Fasten off and weave in the yarn ends.
Part 8 – Lower Red Decorative Border
Join red yarn around the lower edge.
Rnd 1: Ch 1, sc evenly around the edge.
Rnd 2: Ch 1, sc in next 2 sts, ch 1, sk next st. Rep around.
Rnd 3: Change to cream yarn. Ch 1, sc in each sc and work 1 sc in each chain space.
Fasten off.
Part 9 – Green Holly Leaves
Make 12 leaves using dark green yarn.
For each leaf:
Foundation: Ch 7.
Row 1: Sc in 2nd ch from hook, hdc in next ch, dc in next 2 ch, hdc in next ch, work 3 sc in last ch.
Continue along the opposite side of the foundation chain: hdc in next ch, dc in next 2 ch, hdc in next ch, sc in last ch.
Sl st to finish and fasten off, leaving a sewing tail.
Make 12 identical leaves.
Arrange the leaves in pairs around the upper and lower borders. Sew them securely to the lantern body.
Part 10 – Red Christmas Flowers
Make 6 flowers using red yarn.
Rnd 1: Make MR and work 6 sc into the ring. Sl st to join. (6 sc)
Rnd 2: Ch 3, work 2 dc in the same st, ch 3, sl st in next st. Rep around to make 6 petals.
Fasten off, leaving a sewing tail.
Sew a small gold bead into the center of each flower.
Attach the flowers between the green holly leaves around the lower part of the lantern.
Part 11 – Small Green Holly Details
Make 6 small leaves using dark green yarn.
Foundation: Ch 5.
Row 1: Sl st in 2nd ch from hook, sc in next ch, hdc in next ch, work 3 sc in last ch. Continue along the opposite side with hdc, sc, and sl st.
Fasten off, leaving a sewing tail.
Sew the small leaves around the upper decorative stripe, placing them between the larger holly decorations.
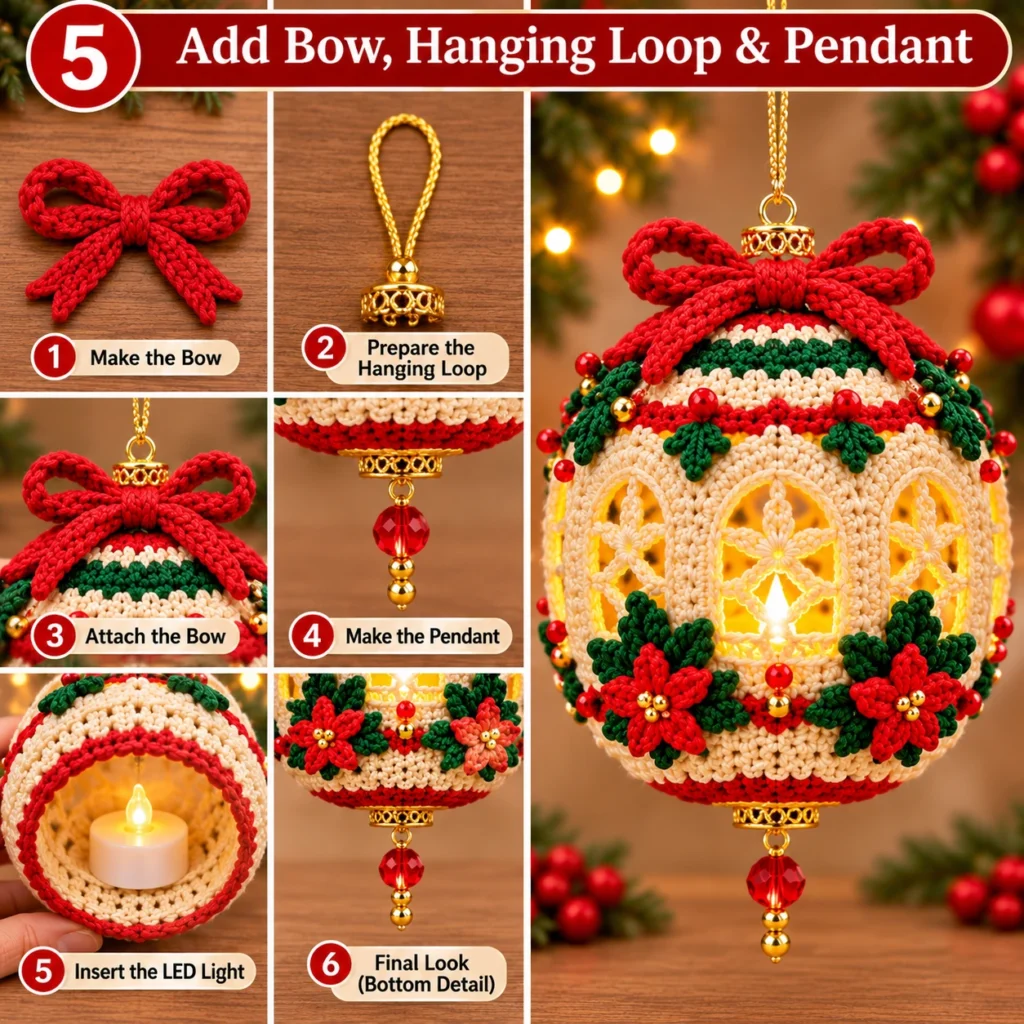
Part 12 – Red Crochet Bow
Use red yarn to make two identical bow loops.
Foundation: Ch 22.
Row 1: Sc in 2nd ch from hook and across. (21 sc)
Rows 2–4: Ch 1, turn, sc in each st across. (21 sc)
Fasten off, leaving a sewing tail.
Make a second identical rectangle.
Fold each rectangle into a loop and sew its short ends together. Place the two loops side by side. Wrap red yarn several times around their centers to create the bow shape. Secure the yarn at the back.
Bow tails:
Make 2 pieces.
Foundation: Ch 16.
Row 1: Sc in 2nd ch from hook and across. (15 sc)
Fasten off.
Sew the two tails behind the bow. Attach the completed bow to the top center of the lantern.
Part 13 – Gold Hanging Loop
Use gold yarn.
Ch 25. Sl st into the first ch to form a loop.
Work 1 sl st in each chain around. Fasten off.
Attach the loop securely to the top center of the lantern behind the red bow. Reinforce the attachment with several stitches.
Part 14 – Bottom Hanging Pendant
Use gold yarn.
- Attach gold yarn at the bottom center of the lantern.
- Ch 8.
- Sl st in the 2nd ch from hook and in each remaining ch.
- Attach a small gold bead.
- Add a red bead below it.
- Attach another small gold bead.
- Secure the final end and weave it into the crochet fabric.
The pendant should hang freely beneath the lantern.
Part 15 – Final Assembly
- Check that all six window panels are securely joined.
- Adjust the top and bottom covers so the lantern has an even rounded shape.
- Check that all six arches are evenly positioned.
- Sew the lace motifs into the window areas.
- Attach the red, white, and green upper stripes.
- Attach the lower red border.
- Sew the green holly leaves around the borders.
- Attach the red flowers and gold bead centers.
- Sew the red bow to the top center.
- Secure the gold hanging loop.
- Attach the bottom red-and-gold pendant.
- Place the battery-operated LED light inside.
- Check that the warm light shines through the openwork windows.
- Weave in all remaining yarn ends.
Finishing and Care
Gently shape the lantern by hand. Keep the crochet fabric away from water while the LED unit is installed. Remove the light before cleaning the crochet cover. Do not use a real candle or open flame.
Finished Design
Your finished ornament features a rounded cream crochet lantern with six decorative arched windows, a warm glowing LED center, red and white stripes, green holly leaves, red flowers with gold centers, a large red bow, a gold hanging loop, and a red-and-gold pendant.
Pattern Note: This is a photo-inspired construction draft, not the original designer’s stitch chart or a physically tested replica. Make one sample panel and check its fit around your chosen LED and support before making all six panels. Adjust the panel width and length to your gauge if needed.